Additional Tool
- 1. Something to cut with - cutter.
- 2.A work surface - a tile or glass
- 3.A medium size metal knitting needle
- 4.A regular oven
Button Hole Position
Directions
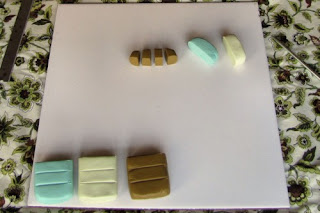
- 50 gram blocks that are scored into four sections. Using your clay blade, and being careful to point the very sharp edge down, cut one of the sections off of each block, and set aside the remaining pieces.
- Cut each of these three ¼ blocks into four smaller pieces. You should now have twelve pieces.
- When you condition polymer, you warm it and knead it well between your fingers. Pick up one of your small sections and smoosh it between your fingers. Press it from all angles. Roll it between your palms into a snake. Ball it up and roll it into a smooth sphere. Continue to play with it in this manner until it feels comfortable to work with.
- When your clay is conditioned and ready to use, roll it briskly around the perimeters of your palms until you have a nice, smooth ball. It may take some practice to get it perfectly round, but the beauty of working with a solid color is that you can mush it up and start over as often as you like. Place the ball on your work surface and press down with your thumb, flattening the ball to about 1/4 inch thick. I like for my buttons to be as free of fingerprints as possible. If you also feel this way, you can gently rub the top of the button with your thumb, and ease the thumbprint off. This is fairly easy to do on a solid color button, but becomes more difficult when you begin working with patterns. You’ll need to develop a very soft, gentle touch.
To make sure that the holes go all the way through from front to back, pick up your button from the work surface and re-poke the holes, this time from the back of the button.
Press your scraps together in your hand until they form a short log. Grasp the log at each end, and turn your hands in opposite directions, in order to twist the log and form thick stripes. Roll between your palms to smooth the edges.
Trim the messy ends off of the snake, and begin coiling the snake.
Use the brayer to flatten the shell into a 1/4-inch slab.
Place a sheet of plastic wrap on top of the slab, and use your cutters to cut out as many buttons as you possibly can.
Poke holes in the buttons, and set the buttons aside on your baking tray.You now have a new pile of scrap clay, made up of the remaining slab, and the two messy ends that you cut off of the snake. Take all of these scraps and repeat the process: form thick snake, twist into stripes, roll out thin & long, coil it, flatten into slab.
Again, cover the slab with plastic wrap and cut out some more buttons. These will be similar to the first, but the striping on them is likely to be somewhat tighter, and you will begin seeing more secondary colors as the original clays combine with each other.
You will have more clay leftover after this pass. Continue to repeat the process, until you are left with an amount of scrap that feels too small to turn into a slab. At this point, skip the slabbing step, and simply turn the whole snake into a single striped snail shell focal button.


No comments:
Post a Comment